You should always dip corals before placing them into your aquarium – it’s not only easy to do but also vital to the health of your aquarium – for several reasons. Here are just a few:
- It removes unwanted and dangerous pests from your new coral. It is no fun to spend $50, $100, or more on a new piece of coral only to discover a few days later that some hitchhiking red bugs… acropora-eating flatworms… or soft coral eating-nudibranchs are chowing down on your precious new gem.
- It protects your existing corals: It’s even less fun to discover a few weeks later that those hitchhiking pests have spread throughout your tank and are also nibbling away at several of your other beautiful corals.
- It refreshes and helps heal new coral after the stress of fragging, shipping, etc. In addition to removing most unwanted pests, a good coral dip also helps to sanitize any irritation or wounds the coral may have suffered – helping to reduce the chance of infection while your new coral acclimates to your tank.
Disclosure: This article contains affiliate links. When you follow a link to purchase the products, I sometimes earn a commission, at no additional cost to you. Read my full disclosure here.
If you’ve never tried to dip corals before, don’t worry – it’s very easy and can be done in five simple steps…
Step 1: Select a Coral Dip
There are several coral dips available to the saltwater aquarist, three of the most popular are Bayer Advanced insecticide, Coral Rx, and Coral Revive. And a fourth that is fairly new and just starting to make some inroads into the hobby is ME Coral Wash Off dip. Here is a quick look at each:
- Bayer Advanced insecticide – yes, this is the insecticide you can find at stores such as Home Depot or Lowes. Many people have great success with it. Bear in mind though, it is an insecticide – if you do not dip properly and rinse really well – there is the potential for trace amounts of the nerve-agent chemical it contains – imidacloprid – to be absorbed by fish and other tank inhabitants. The risk is probably small and MANY people use it.
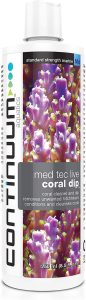
- Coral Rx – is probably the most popular off-the-shelf coral dip made specifically for treating corals.
- Coral Revive – another popular off-the-shelf coral dip.
- ME Coral Wash Off – an new up-and-comer. Like the other two brands mentioned, it relies on in relies on lemon and pine oils as its primary active ingredients. However, unlike the others, it also contains lavender oil – and it’s concentration of all 3 oils is slightly higher than the others.
I chose to use ME Coral Wash Off and have not yet tried any of the others.
Once you have your chosen dip in hand, it’s time for the next step.
Step 2: Prepare to Your Dip Corals
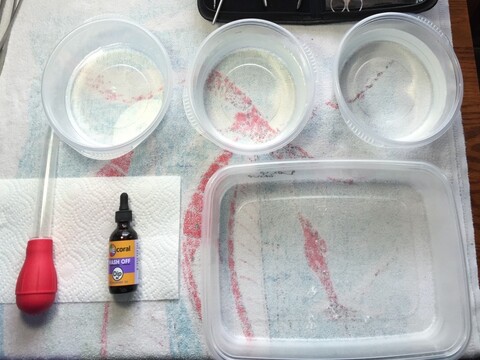
Things will go much quicker if you have everything prepped and on hand before you begin to dip corals. This is a list of items you’ll need:
- Your chosen dip – my case it is the ME Coral Wash Off 4x (they also make a 2x – which is half the concentration)
- At least two containers – one for the dip and one for the rinse
- A pair of gloves
- Safety glasses
- An old hand towel
- A magnifying glass
And here are a fe
w optional items I also find it very handy to have
- An empty 12″ x 9″ container
- A coral tool
- And a turkey baster
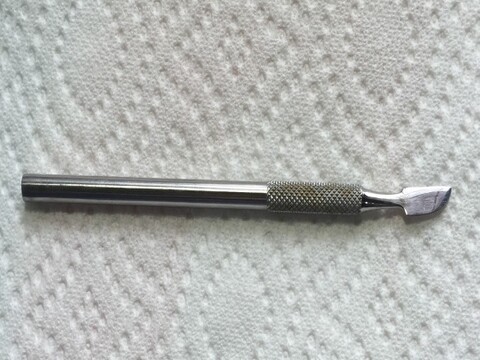
- A glue removal tool
- AND, if your display tank is small like mine, a gallon or two of fresh saltwater
By the way, I use cheap Glad food storage containers for my dipping.
And yes, I highly recommend using gloves and safety glasses when you are going to dip corals. Regardless of which dip you choose, you are going to be working with pesticide and/or pharmaceutical-grade essential oils. Neither is something your skin really needs – let alone your eyes if it should happen to splash. Oh, and remember some corals – such as zoanthids and palythoas – contain toxins.
Here’s a quick shot of my setup:
Step 3: Dip Corals and Observe
Mix up your dipping solution per the instructions on your dip.
In this case, the ME Coral Wash Off 4x calls for 15 drops mixed into 1L (~32 oz) of saltwater. So I took a quart of saltwater out of my display tank (DT) and poured it into my dipping container (top right of pic)… added 15 drops of Wash Off… and mixed it with the turkey baster. Then, since my DT is small (24g), I poured a quart of freshly mixed saltwater back into it to replace what I had taken – otherwise my automatic top-off would put a quart of RODI water into the tank to replace the lost volume and end lowering my salinity.
Fill your rinse container.
I took another quart of water from my DT and poured it into my rinse container – and poured a second quart of fresh saltwater into my DT to once again replace what I had taken.
Since I was also going to be super-gluing the new coral frags onto live rock in my DT, I put about an inch of fresh saltwater into the third round container pictured (far left) to use as a ‘glue rinse’. More on this in a moment…
Place your coral frags into the dip and let them soak in it for the amount of time called for in your chosen dip’s instructions.
ME Coral Wash Off calls for 5-10 minutes so I left them in for ten. During that time I basted them with the turkey baster to help flush off any pests or dirt. If you don’t have a turkey baster you can also hold each frag and, one at a time, gently swish them a bit with your hand.
While they’re soaking use a magnifying glass to do a very thorough visual inspection for any unwanted pests, critters, or they’re eggs. You may need to use the turkey baster or a tool to very gently flush or scrape them off if the wash alone isn’t enough.
Step 4: Rinse
Once the soak time is up, take them out of the dip and place them in the rinse. Use the turkey baster or your hands to give each a gentle flush or swish to ensure the dip is thoroughly rinsed off.
Your corals are now ready to be placed in either a coral quarantine tank or your display tank depending on your own personal comfort level.
Step 5: Place
That’s it – you know now how to dip corals.
Wait a minute, what about the glue tool and big empty container you ask?
Well, I don’t have the room in my townhouse for a dedicated coral quarantine tank. And my display tank does not have thousands of dollars of coral or livestock in it. So, I put my corals straight into my DT after dipping (All the more reason to dip! At least it offers some level of safety.) That’s where the big rectangular container and glue removal tool come into play…
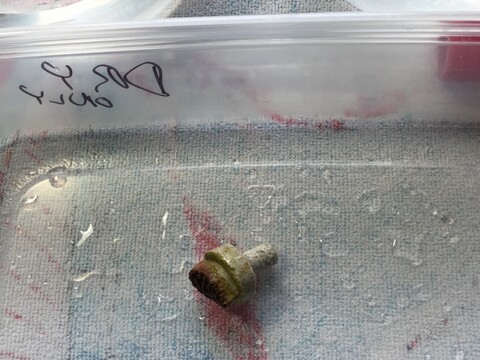
I prefer to remove my coral from the frag plugs whenever possible. Any pests or algae that may still be on the plug will end up in the tank. And I think the tank just looks better without them.
I simply place the coral frag in the container and hold it steady with one hand. Then I place the edge of the tool at the seam where the glue meets the frag plug and apply firm, gentle pressure. The coral usually pops right off and the container catches any little bits of glue that crumble off.
You can see I’ve marked the container ‘dry only’. Sometimes a plug is a little stubborn – and when its glue finally does give, the tool thwacks the bottom of the thin plastic container. It may make a pin-hole puncture in the bottom. So I marked it so I’ll be sure to never use it to hold any water for dipping, etc., just to be safe.
A dollop of crazy glue on the bottom of coral… a quick dip of just the glue dollop in the ‘glue rinse’ (when crazy glue first hits the water a little sheet of film comes off it. I prefer not to have it floating around the water surface of my DT, hence the quick dip in the ‘glue rinse’ water.)… and into the tank the coral goes.