Let’s take a look at how to drip acclimate fish.
When should you drip acclimate new additions to your aquarium?
It is best used in situations where a quarantine tank is either unavailable, or you cannot adjust the alkalinity of your quarantine tank to match the water your new fish came in.
Many experienced aquarists recommend drip acclimation not only for new fish but also invertebrates such as shrimp, snails, urchins, and sometimes even corals.
Disclosure: This article contains affiliate links. When you follow a link to purchase the products, I sometimes earn a commission, at no additional cost to you. Read my full disclosure here.
It may appear a little daunting at first. But don’t worry, once you actually give it a try, you’ll see just how easy it can be.
You can drip acclimate fish in 3 simple steps:
Step 1 – Set-up:
First and foremost, if you ordered your fish online, contact the vendor and ask if they use a copper-based medication in the water they ship the fish in. This is VERY important. I’ll explain why in a moment.
You’ll need the following items to drip acclimate your fish:
- A 3 to 4-foot piece of narrow tubing – such as airline tubing
- A gentle clamp, potato chip bag clip, or a few pieces of painter’s tape (for clipping/taping the drip line to your tank without pinching it shut)
- A clean or sterile container that will be no more than 40% full when you place the fish and their transport water into it
- Another 3 – 4 foot piece of tubing, or a turkey baster for emptying water out of the acclimation container
- Extra saltwater that matches the salinity and temperature of the tank you’ll be adding the fish to (just in case a spill or something unexpected should happen, and you need more saltwater fast).
- An empty bucket.
- Fish net.
- And for FISH ORDERED ONLINE ONLY: A water conditioner such as StressGuard, Stress Coat Marine, Seachem Prime, or a similar water conditioner that detoxifies ammonia
When you’re ready to begin, set it all up like this…
Place the empty container next to your quarantine tank or display tank (whichever your fish will be going into once the acclimation is finished).
Ensure the drip line can reach from inside the quarantine/display tank into the acclimation container with a few inches of extra length left.
Tie a snug knot into the drip line.
Drape the drip line over the rim of the quarantine/display tank so that one end is a few inches below the water surface and use the clip or tape to hold it in place. Again the drip line should be long enough so that the other end reaches into your acclimation container.
Here is what mine looks like when I set it up:
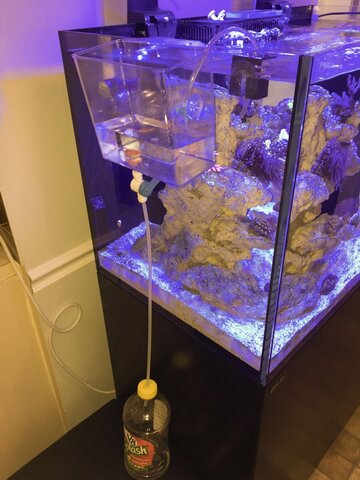
You can see the drip line reaches from a few inched below the water in my display tank, up over the tank rim, and down far enough to reach into the styrofoam container I was using as my acclimation container. Look at the drip line just a little more than half way down and you’ll see the two knots I tied in it.
You can also see the suction cup holding the drip line in place in lieu of a clip or tape. I ordered this particular batch of fish – a tailspot blenny, a green canary fang blenny, and a pink-streaked wrasse – from BlueZooAquatics. They actually include a drip line, suction cup, and sample packet of Seachem StressGuard with all of their fish orders.
If you have a lot of fish to acclimate, do it in batches. That way your acclimation container won’t be overcrowded with stressed-out fish.
And if you have inverts (shrimp, crabs, snails, etc.) or coral you also need to acclimate do each group separately. My preferred order is fish first, then inverts, then coral.
That’s it for set up.
Step 2 – Begin the Acclimation:
- Shut off your tank lights and dim the lights/window shades in the room – the fish will feel less stressed in the dim environment.
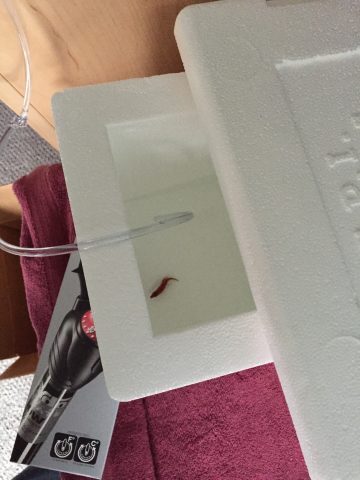
- Open the bags or containers your fish arrived in and gently empty the fish — and the water they were transported in, into your acclimation container. If necessary, prop up one side to ensure the water is deep enough to keep the fish submerged. (Notice in the pic below how I used an empty heater box to prop up one end of mine…)
- Now, if and only if you ordered your fish online AND they were not shipped in water containing any copper-based medication — add 4 or 5 drops of StressGuard (or another ammonia detoxifier) to the water in the acclimation container.
- This is VITAL. Otherwise, the sudden surge in ammonia could burn the gills of your fish and most likely kill them. (More on the science behind why this happens can be found in several saltwater aquarium discussions such as this one.)
- StressGuard and Stress Coat Marine also have added benefits. They help seal any little scratches or wounds the fish may get during the acclimation process and help prevent infection.
- HOWEVER, if the fish were shipped in copper-medicated water DO NOT add any type of water conditioner or stress protector to the acclimation water. It will bond with the copper, make the water toxic, and poison the fish. Instead, you will simply have to hope the drip acclimation is finished before the ammonia toxicity rises to harmful levels.
- DO NOT add any type of water conditioner or stress protector to the water if you purchased your fish at a local fish store. The fish will not be in their transport bags long enough to create an ammonia build-up. More importantly, many local fish stores use copper-based medications in their water. So using a water conditioner could poison the fish during acclimation.
Alright, now that the fish are in the acclimation container, it’s time to start the actual ‘drip’ in drip acclimation…
- Begin a siphon by sucking on the end of the drip line tube that you will be placing into the acclimation container. Once the water starts moving through the drip line and into the acclimation container, loosen or tighten the knots as needed to achieve the flow of 2 – 4 drops per second. (NOTE: if you are drip acclimating inverts, reduce the flow to about 1 drop per second. They are more sensitive to salinity changes, so with them, slower really is better.)
- The goal is to have the volume of water in the acclimation container double in 30 – 40 minutes.
- Once the desire flow is dripping through the drip line, cover the acclimation container if you can. Be sure not to pinch drip line shut with the lid/cover. Less light will reduce the stress on the fish. And, if any happen to be species that tend to jump when frightened, it will help prevent them from jumping out of the container.
- Keep an eye on your container to ensure there are no leaks and spills as the water volume increases.
- Once the volume of water in the acclimation container has doubled, discard half of it. You can use the siphon tube or turkey baster to drain it into the empty bucket.
- Repeat this process 2 or 3 times. (NOTE: If you are drip acclimating inverts, only one ‘doubling’ of water volume is needed before moving on to the next step.)
Step 3 – Place the Fish Into Their Next Home
- Gently net one fish at a time to prevent scratches or wounds, and place each fish into your quarantine or display tank. (NOTE: Inverts can be removed from the acclimation container and place onto the sand bed or tank bottom of their new home by hand.)
- Leave the tank lights off for a few hours to give your new livestock a chance to adjust.
- And wait a few hours or until the next day before feeding.
That’s it.
Congratulations! You’ve just learned how to drip acclimate fish.